Food photography guide
Before I start this post I would just like to say, I am not a “professional” photographer. I am writing from experience built up over the past 5 years while helping on simply-delicious-food.com and my love of photography. I do not actually take any of the photo’s here, I just pass on any knowledge I may pick up while on my own photography journey.
Note: Some of the tips here might vary depending on your camera equipment.
With more than 500 million photos uploaded and shared each day online, you need to make sure the ones you take are the best they can be.
In a previous post “10 Tips for bloggers” I spoke briefly about how important lighting is, I also mentioned that buying a R30 000 ($3000) camera will not suddenly make you a better photographer. This would be like buying a fast car thinking it would make you a better driver. First you need to understand what makes a good photo and why, once you understand this you can go out and practice.
Understanding Light.
“Light makes photography. Embrace light. Admire it. Love it. But above all, know light. Know it for all you are worth, and you will know the key to photography.” – George Eastman
Lighting plays a very important role in photography and something as simple as the type of lighting used could make or break your photo.
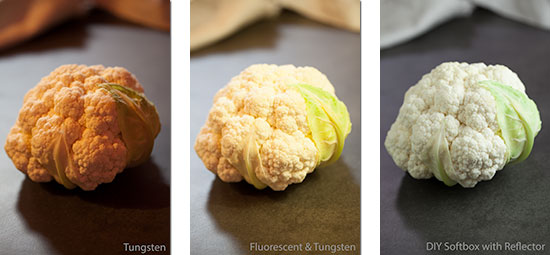
One of the first mistake I see very often in food photography is incorrect white balance, in the below photos you can see how having the incorrect white balance will affect your photos , fortunately this is relatively easy to fix.
The first image is something I see a lot, reason being most food bloggers take their photos indoors using normal ceiling lights or lamps which use tungsten bulbs. This will give your images a yellow-orange tint which is not desired. The other problem with using normal ceiling lights or lamps is the lack of control. You will notice the shadow in the image is horrible, it is badly positioned as well as being way too dark.
One way to fix colour correction is by changing the white balance setting on your camera to the type of light you are using, the other option is to shoot in RAW, I recommend always shooting your photos in RAW as this allows you to make many more changes in post processing without compromising quality. If possible the best solution is to shoot with good lighting which would either be defused natural light or a softbox.
The middle image is actually the worst although it doesn’t look as bad as the first, I shot this with the same Tungsten lights from the first image but I also turned on a florescent ceiling light. It is a very bad idea to do this because you are mixing different types of light and it will make it very hard (or impossible) to white balance. Always try using one type of light. Natural light only when shooting with natural light, artificial only when shooting with artificial light.
The third image is my favourite when natural light is not possible. This image was taken with a softbox I built myself. Using a softbox allows for much more control of your lighting and it will make white balancing easy. We also used a reflector in this image to soften the shadows and add more light to the left. The reflector we use is a large piece of foam core which can be purchased at most arts and craft stores.
To make white balancing even easier, purchase a gray card. They can be found at most photography shops and they are relatively inexpensive. If you would like more info on using a gray card please leave a comment or email me.
Shadows.
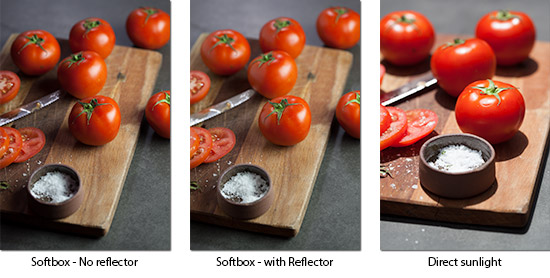
Shadows help give your photos depth and definition, in the below 3 photos you can see how changing small things in your lighting can affect your shadows.
In the first image we have a softbox on the right, this creates soft but slightly dark shadows on the left of the tomatoes.
The second image has the same setup but we added a reflector (large piece of foam core) to the left side, this lightens our shadows as well as softening them more.
In the third image we used direct sunlight which creates very harsh dark shadows which are not appealing at all. If you are going to take photos in natural light you will need to defuse it. You can do this with a large piece of white fabric such as muslin or cheesecloth which is sheer enough to let the light through while defusing the sunlight. Many bloggers take photos next to a window with a bed sheet draped over it. This creates very nice light but remember to make sure all other light in the room are off or they could ruin your shot.
Many people, including Alida, would use the first image. I personally like the middle image because it is much more versatile. You could always take it into Photoshop or Lightroom and darken the shadows, giving it the same effect as the first image. Alternatively, I could also lighten it even more without losing too much information. When you take a photo that is either too dark or too light, you will lose information in those areas, this information cannot be recovered so always try not to over or under expose your images.
Flipping the auto switch.
Many people struggle understanding things like ISO, Shutter speed and Aperture so they normally get stuck shooting on auto. Hopefully by explaining them to you, you’ll feel brave enough to switch to manual.
Understanding ISO, shutter speed and aperture.
It is very hard to understand how these things work when you don’t understand a little about all three of them. This is why I am going to start with short descriptions of each and then move on to each one in more detail.
The ISO of your camera determines how sensitive the image sensor is to light. The higher your ISO, the more sensitive the image sensor will become which will also add a lot more grain or noise to the image. Ideally you would want your ISO as low as possible, for most cameras this is 100. The only time you should increase your ISO is when it is not possible to gain more light by adjusting your shutter speed and aperture. You should try to never go above 800 ISO.
Shutter speed sets the length of time that your cameras shutter will be open, passing more light to the sensor. Faster shutter speeds are usually used to freeze fast moving subjects, for example at sporting events. Slower shutter speeds are commonly used to add a blur effect to a moving subject.
Your aperture is actually related to your lens and not the camera itself.The aperture will determine how wide the opening is in the lens when a photo is taken. A low aperture such as f2.8 means your lens has a very wide opening and will allow more light to reach the image sensor, a high aperture such as f3.2 would mean the lens opening will be small and very little light would pass through it. A low aperture also creates a shallower depth of field which I will explain later.
The above information should help with understanding each setting as I explain them in more detail below.
Lets start with ISO since it is the easiest to understand.
ISO.
The below picture was taken using 100 ISO, you will notice in the bottom right corner I have included a 100% crop of the original image, the crop is very clear and the it contains very little noise.

Now look at the next photo that was taken at 6400 ISO, if you look at the 100% crop you will notice it has a lot more grain or noise and is not great quality.

In food photography you want your images to be as crisp and clear as possible, so the lower the ISO the better. It is also pretty simple to keep your ISO low since you have a lot of control over what you are photographing.
Firstly, your subject is not moving (Unless you are drizzling honey or pouring liquid in the shot) and you should also be using a softbox or good natural lighting. Most of the time you’ll want a shallow depth of field so your aperture should also be relatively low. With all this you should have more than enough light to set your ISO to 100.
Shutter Speed.
It is very important that you use a tripod when following these tips, holding the camera might not have the same results because you will introduce a lot of shake which will blur your images. If you are going to be holding your camera, try keep the shutter speed above 1/60 then adjust the ISO and aperture a little instead of lowering your shutter speed.
If you are using a tripod it is possible to go well below 1/60 without any noticeable blurring, I usually use my shutter speed to add in most of the light needed for my photos, this allows me to keep the ISO at 100 for most shots. In other types of photography a slow shutter speed can also create very cool effects such as long exposure photography, but we will only be focusing on food for now.
Aperture.
The last thing is aperture which should be really simple now that we have out ISO and shutter speed done.
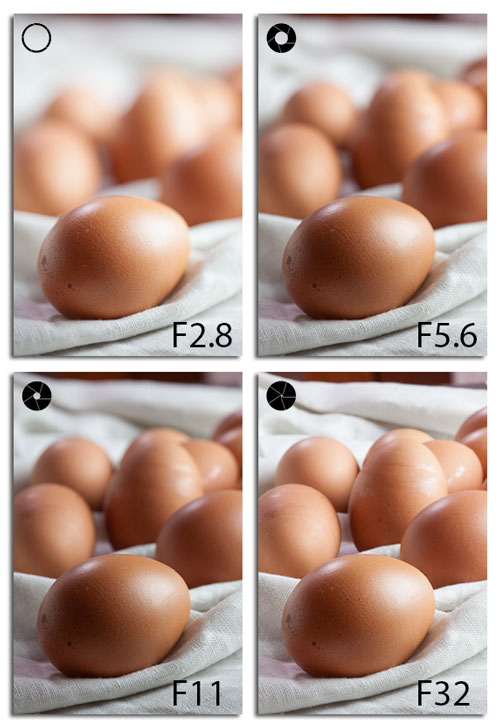
Since we are focusing on food photography, I recommend setting this to around f/4.0 – f/5.6 and then adjusting as needed, if you set your f-stop to f/4.0 and your photo is either too dark or light, rather change your shutter speed before trying a different f-stop. Only change your aperture once your photo is correctly exposed and you still don’t like the depth of field. You should now notice that every time you adjust the aperture your photo will either get lighter or darker as well as change the depth of field. Always remember that you want to compensate this change by only using your adjusting your shutter speed.
Below are a few image I took showing the same image with different apertures, I added a small icon to the top left corner which shows you how wide open the lens is at each aperture. All these photos have been taken at 100 ISO with the aperture set to the number in the bottom right, the only thing that has change is the shutter speed.
A quick breakdown.
Start off with your ISO at 100
Set your shutter speed to 1/60 and only go lower if using a tripod.
Set your aperture to around f/4.0 – f/5.6
If you need more or less light adjust your shutter speed.
If you are shooting without a tripod and not getting enough light with a shutter speed of 1/60 adjust your ISO but try not go above 800 if possible.
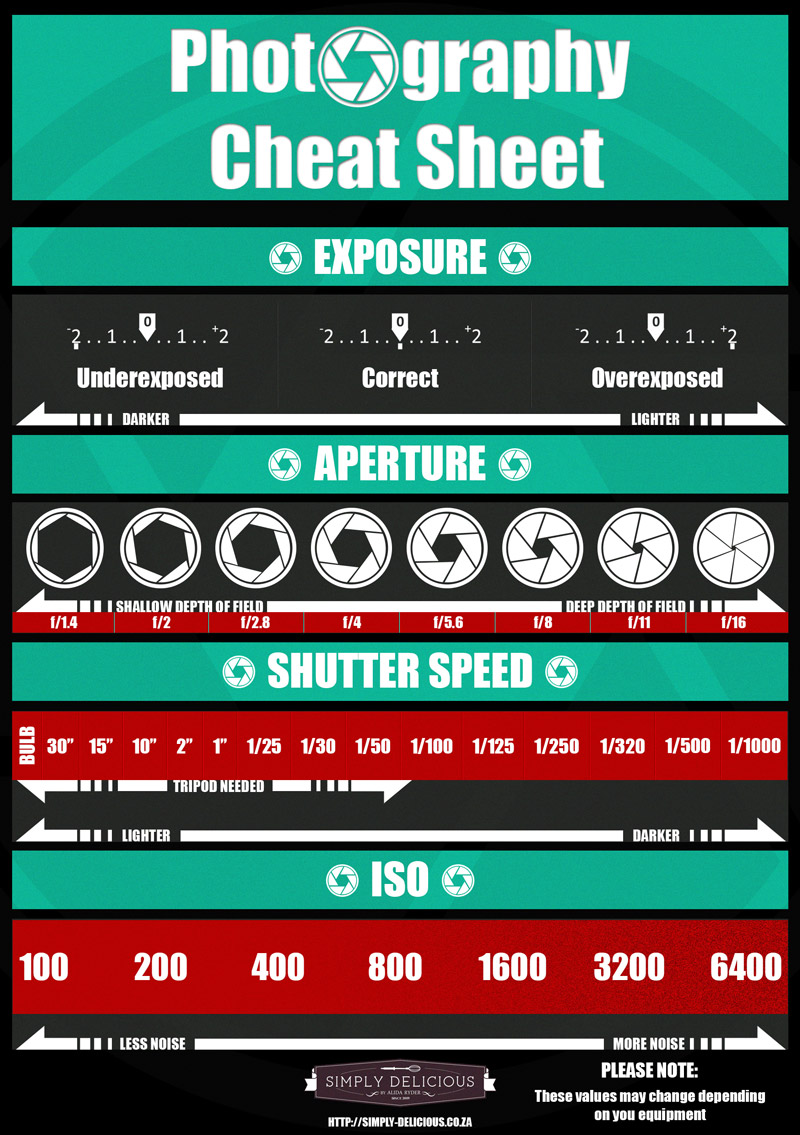
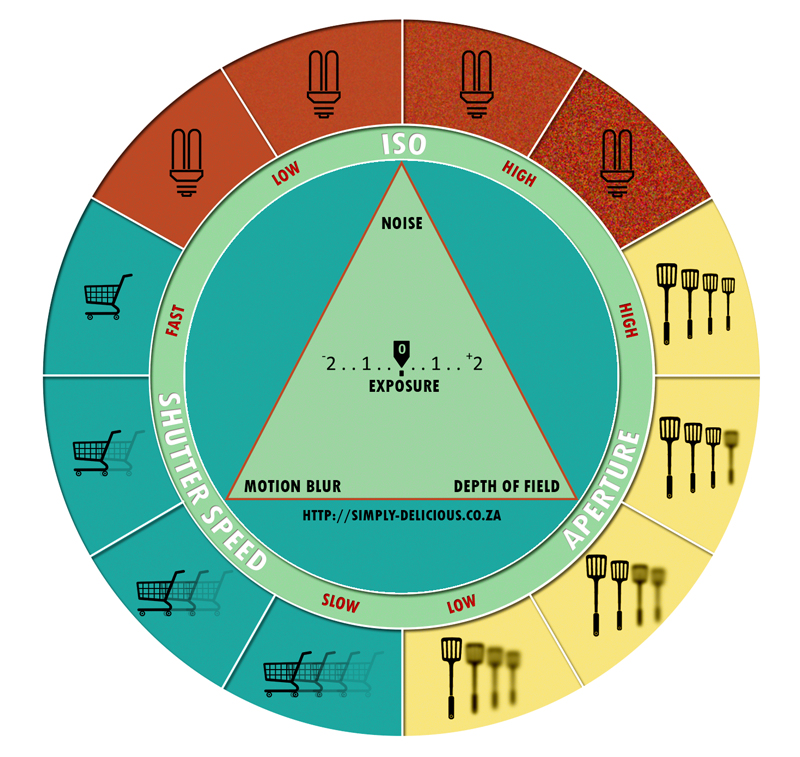
I have created the below Photography cheat sheet and exposure triangle for you, please feel free to print and share them.
Photography Cheat Sheet
Exposure Triangle
Admiring the time and energy you put into your website and detailed information you present.
It’s awesome to come across a blog every once in a while that isn’t the same old rehashed material.
Great read! I’ve saved your site and I’m adding your RSS feeds to my Google account.
Thanks for the lovely compliment!
Awesome post… Very useful for budding bloggers like me..
Thanks so much! So glad you found it helpful.
You could certainly see your skills within the work you write.
The world hopes for more passionate writers such as you who aren’t afraid to mention how they
believe. All the time follow your heart.
I found this post SO helpful! Thank you for taking the time to put it together, the comparison photos really helped me understand it all. Hopefully I’ll see a pretty huge improvement in my food photography now 😛 Pratice pratice pratice!
We are so glad you found it helpful Lilly! And yes, practice makes perfect. 😉
This was super freaking helpful! I’m teaching everything to myself right now because I can’t fit photography classes in my schedule at college. I’ve had trouble understanding some of this stuff and this was a fantastic break down of it
So glad you liked the tips Iris.
Great post. I would love to learn more about using a gray card.
You can use your jeans (if you have them on) to meter. It’s the same exact tone as a gray card!
How interesting!! I suppose it depends on the shade of denim though? Thanks for sharing.
I can’t bear reading lengthy articles, simply because i’ve got some dislexia, but i really
liked this one
You have no idea how appreciative I am of all your advice in blogging, specially this post. Thank you SO SO MUCH 🙂
Only a pleasure Pang. So glad you are finding these posts helpful!
This is so very useful! My ma is a photographer but my skills are shocking. Have bookmarked this easy tutorial for future reference 🙂
Hope you find the tips helpful!