Easy Cinnamon Raisin bread
Inspired by my love of Hot Cross Buns, this Easy Cinnamon Raisin Bread is the perfect recipe for Easter. Soft, fluffy and perfectly spiced.
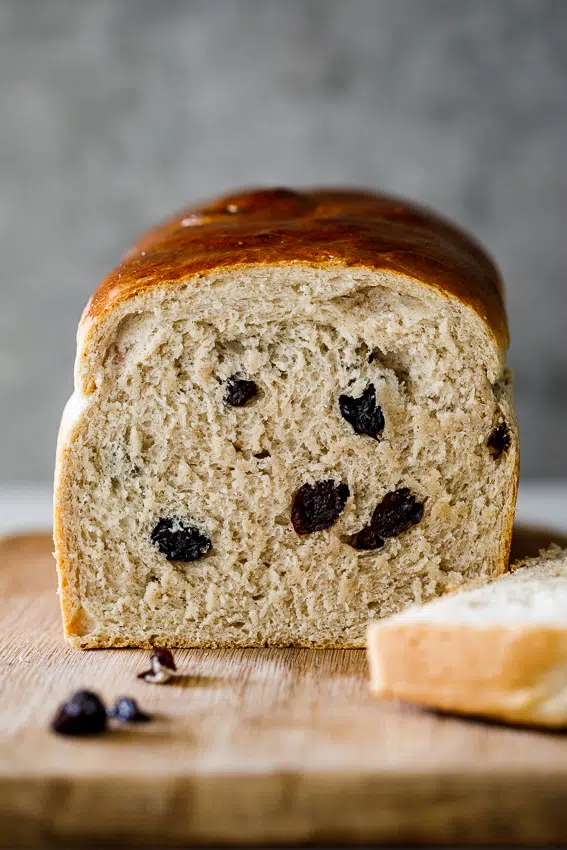
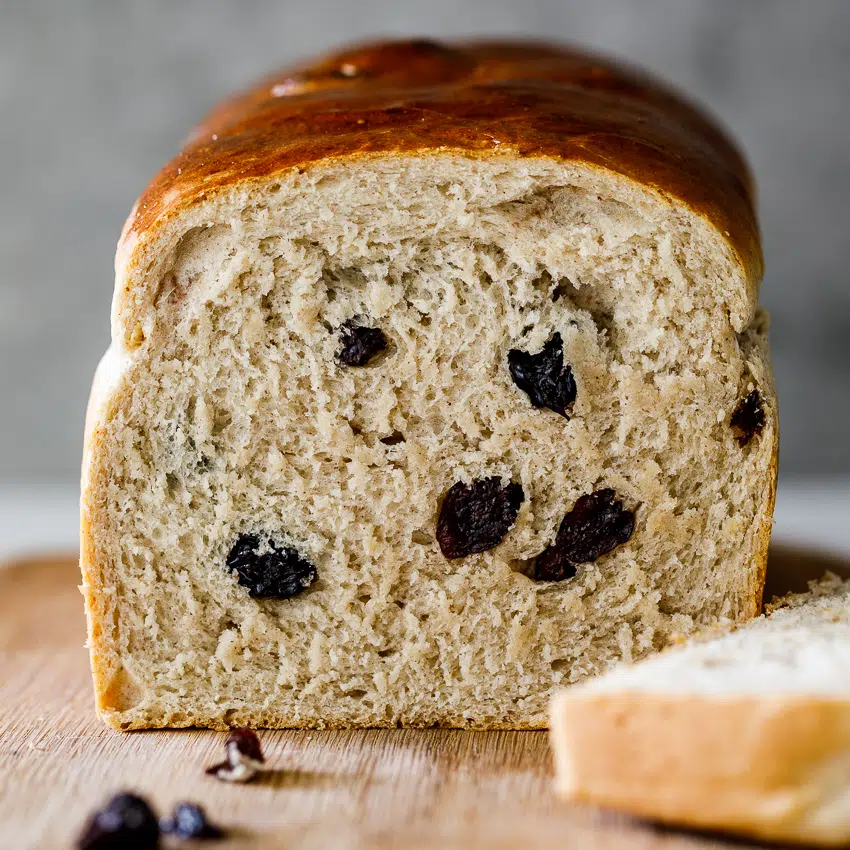
Cinnamon Raisin Bread: Soft, Fluffy and Perfectly Flavored
I absolutely love Hot Cross Buns and it’s simply not Easter without them. However, I love toasting hot cross buns so this raisin bread gives me all the joy of my beloved Easter treat with the added benefit that slices can easily be toasted. However, this bread is so soft and fluffy, you’d be forgiven for eaten slice after slice as is. No toasting necessary. To make this as easy as possible, I adapted my Easy White Bread recipe and just added the flavors of hot cross buns. No egg necessary and if you don’t have butter, you can use oil!
If you are not a fan of raisins or dried fruit (cranberries, chopped apricots, etc. can be used instead of raisins), use chocolate chunks or leave them out entirely. This bread recipe will be delicious regardless.
Ingredients and Substitutions
This recipe requires the usual ingredients you would need for bread: flour, yeast and liquid. If you want the dough to be a little richer, milk is a great substitute for water. Softened butter creates a moist baked loaf but I’ve made this with oil too. The spice and raisins add flavor and texture. You could use allspice too, but I don’t often have that in my kitchen.
- Flour: I used cake (wheat) flour but you can use all purpose flour or bread flour too. Stoneground flour will need a little extra rising time but most commercial bread flours will react the same as all purpose or cake flour.
- Yeast.
- Milk / Water: I used half milk and half water but you can use only milk or only water if you prefer.
- Sugar.
- Spices. Cinnamon, nutmeg and ground ginger.
- Butter. You can use vegetable/canola oil too if you prefer.
- Raisins. Use any dried fruit you like or substitute with chocolate chunks/chips.
- Salt.

How To Make Raisin Bread
1. Make The Dough
- Combine the warm water and milk with the yeast and sugar – allow to stand until foamy.
- Combine the dry ingredients in the bowl of a stand mixer.
- Add yeast mixture and butter then knead until smooth. Mix in the raisins.
- Cover and let rise until doubled.
- To make by hand: Mix wet and dry ingredients in a bowl, knead on a floured surface and allow to rise.
2. Shaping And Baking The Bread
- Press dough into a rectangle.
- Roll into a log and pinch the seam together.
- Place in a lined loaf pan, cover and let rise for 30 minutes.
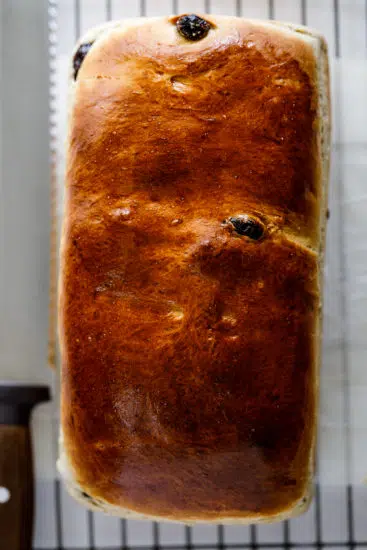
- Brush with egg then bake until golden.
- Once baked, brush with melted butter and allow to cool before slicing and serving.
Making Ahead and Freezing
- Freezing: Freeze slices of raisin bread and toast from frozen. Alternatively, the dough can be frozen in a loaf pan and baked from frozen.
- Making ahead: Baked raisin bread will last for up to 3 days wrapped in foil on the kitchen counter.
Ingredients
- 3/4 cup warm water
- 3/4 cup warm milk
- 10 g (2tsp) instant yeast
- 2/3 cup sugar I used white sugar but brown sugar can be used too.
- 3-4 cups flour (any white flour can be used: Cake, all purpose or bread)
- 1 tsp salt
- 1 tsp ground cinnamon
- 1/8 tsp nutmeg
- ½ tsp ground ginger
- 1/3 cup butter / oil (room temperature butter)
- 1 cup raisins
- 1 egg beaten (for egg wash) (optional)
Instructions
- Whisk water, milk, sugar and yeast together. Allow to stand for 10 minutes until foamy.
- In the bowl of a stand mixer fitted with the dough hook attachment, combine the flour, spiced and salt.
- With the mixer running, add the yeast mixture and allow to knead in.
- Add the butter or oil, allow to knead in then add more flour, one third cup at a time until the dough is smooth. Add the raisins.
- Knead for another minuted until the dough comes away from the sides of the bowl.
- If the dough is still very sticky, add more flour and knead in.
- The dough should be smooth and soft and only a slight bit sticky.
- Cover with plastic wrap or a damp towel and allow to rise for 1 hour.
- To make by hand: Follow the ingredients as above, just mix with your hand in a large bowl until a shaggy, soft dough forms then turn out onto a floured surface and knead until soft and smooth. Place back into a greased bowl, cover and allow to rise for an hour.
- Once the dough has proofed, press it into a large rectangle on a lightly floured surface. Press any raisins that have fallen out of the dough into the center. Roll onto its self into a log, pinch the seam then transfer to a greased loaf pan that you've lined with parchment paper.
- Cover again and allow to rise for 30-45 minutes in a warm spot while you preheat the oven to 180°C/350°F.
- Brush with beaten egg and place in the oven and allow to bake for 30-45 minutes until golden brown and risen. If the bread browns too quickly, loosely cover with a piece of foil and continue baking. Once baked the bread will sound hollow when tapped on the bottom.
- Remove from the oven, brush the crust with melted butter (optional) and allow to cool before slicing.
Notes
Tips for the perfect Cinnamon Raisin Bread:
- Don’t overheat the liquid: Take care not to heat the water and milk too much, you want the liquid to be just warm enough so that when you stick your finger in, it feels pleasantly warm, not hot. If the liquid is too hot, it will kill the yeast.
- Allow sufficient rising time: Don’t be impatient – allow the dough enough time to double in size for the first rise. Pace the dough in a warm place to speed up the proofing.
- Cool completely: Let the baked bread come to room temperature on a wire rack before slicing – at least an hour is recommended. Slicing into the bread too quickly can create a gummy texture.
I want to make this. However I do not like white bread. Can I use 1/2 wheat, 1/2 white?
Sure, the finished bread might just be a little more dense.
I am determined to perfect my technique because this came out AMAZINGLY DELICIOUS (don’t want to go back to store bought), though a little short and dense.
What roughly is the kneading time frames for when adding ingredients in the mixer? Should I have hand kneaded again after the first proofing when we’re to press into a rectangle then shape for loaf tins? Or is it best to handle as little as possible?
After the initial kneading, I don’t feel the need to knead again. I would suggest making sure your initial kneading is sufficient. The dough should be soft, slightly tacky with good stretch. Proper proofing is also necessary.
Can you use honey instead of sugar
I haven’t tested it with honey but if you try it, please let me know how it turns out.
I made your White bread loaf this a.m. for a 2nd time. Turns out perfect! Was searching for recipe to make cinnamon raisin, NOT using swirl, and found your’s! Will be making this one to take on Thanksgiving for my son! His fave! Will check out your other ideas! “Happy Thanksgiving!”
🦃
Currently have this in the oven recipe was easy to follow. Iv done one with a cinnamon sugar butter inside and rolled it up fingers crossed that one goes well if not I got a plain one also will comment again after
I lloooooveeee this recipe! First time making a bread, other than pizza dough and it turned out bellisamo! Thank you! I did my kneading in my food processor with the dough blade in very short pulse bursts. Fantastic. I have gotten all of my friends to make it as well, (they were coming over to eat all of mine) All of them have been over the moon at how easy it is.
YAY! I’m so pleased to hear that, Cindi.
Hi am planning on making your recipe tomorrow! It sounds easy and very delicious! Thank you!
Made this today, flavour was delicious!
But mine came out quite dense not sure what i did wrong I cooked for 40mins.
Maybe I over mixed? Is that a thing ha i’ve never made bread before!
*Do you think halving the sugar would change the flavour too much. My toddler loved this bread but it has so much sugar for her.
You can absolutely halve the sugar if you wish – of course the bread will be less-sweet but that’s a preference thing. It could be that the yeast you used was a little on the old side so it didn’t give the dough the rise it needed. I find the second rise in the pan is quite important for the final texture of the loaf.