Candy Cane Cookies
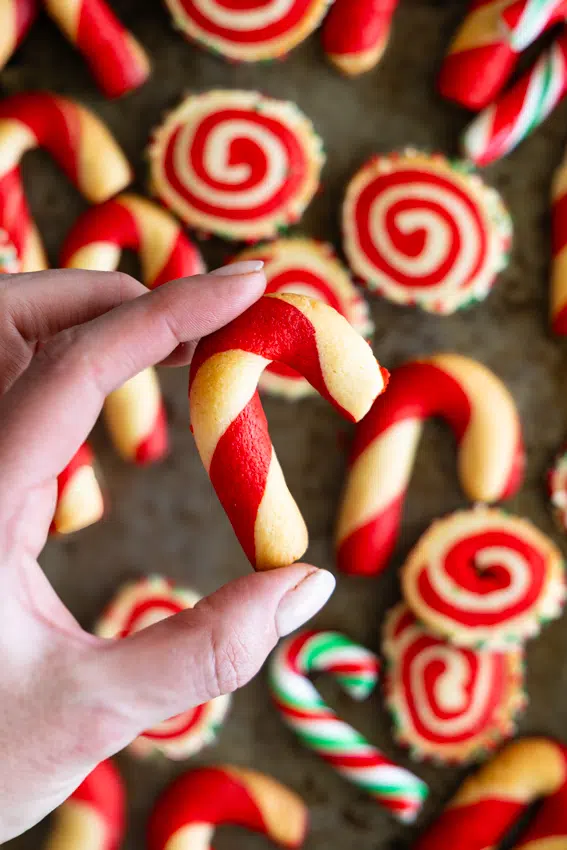
These adorable candy cane cookies are guaranteed to be one of your favorite Christmas traditions! Made with a simple sugar cookie base, half the dough is colored red, then both colors are rolled together to create those iconic red and white candy cane swirls. They look absolutely festive and impressive, but I promise they’re much easier to make than they appear!
Whether you’re baking for cookie exchanges, holiday parties, or just to make your kitchen feel extra festive, these candy cane sugar cookies are guaranteed to bring smiles. Plus, there’s something so satisfying about rolling those red and white spirals together. It’s almost like edible Christmas crafting!
Why You’ll Love These Candy Cane Cookies
❤️ Easier Than They Look – The swirled candy cane effect seems fancy, but it’s actually quite simple once you get the hang of rolling the dough together. Even if they’re not perfect, they still look adorable!
🤍 Classic Christmas Flavor – These are buttery, sweet sugar cookies with that familiar flavor everyone loves during the holidays.
❤️ Festive Appearance – The red and white swirls are instantly recognizable and scream Christmas. They make your cookie platter look professional and thoughtful.
🤍 Fun to Make – This is a great recipe to make with kids (though maybe not toddlers, there’s some finesse required). The rolling and shaping process is engaging and creative.
❤️ Perfect for Gift Boxes – Their iconic shape and colors make them ideal for Christmas cookie boxes and holiday gifts.
🤍 No Special Tools Needed – Unlike some decorated cookies, you don’t need cookie cutters, royal icing or piping skills. Just your hands and some food coloring!
Ingredients and Substitutions
This recipe is based off my classic sugar cookie recipe. It’s my go-to recipe because it’s delicious but it also keeps its shape really well while baking.
For the Sugar Cookie Dough:
- Flour. All purpose flour or cake flour.
- Cornstarch.
- Butter.
- Granulated sugar.
- Egg.
- Vanilla extract. Feel free to use almond extract or peppermint extract for authentic candy cane flavor.
- Salt.
- Red gel food coloring.


How to Make Candy Cane Cookies
This candy cane sugar cookie recipe comes together in simple steps:
- Make the sugar cookie dough: Cream softened butter and sugar until light and fluffy. Add egg and vanilla (and peppermint extract if using), then mix in your dry ingredients until a soft dough forms.
- Divide and color: Divide the dough in half. Leave one half plain (white) and knead red food coloring into the other half of the dough until you achieve a vibrant red color. The more you knead, the more even the color becomes.
- Chill the dough: Wrap both portions separately in plastic wrap and refrigerate for at least 10-15 minutes. This makes the dough easier to handle but if it’s too cold it will be too brittle to shape.
- Roll the ropes: Take about 2 tablespoons of red dough and roll it between your palms and the counter into a rope about 4-5 inches/10-12cm long. Do the same with the white dough. The ropes should be about ½-inch thick.
- Twist together Place the red and white ropes side by side and gently twist them together, then roll lightly to seal. Cut into 2-3in/5-8cm sections. Curve the top into a candy cane shape.
- Chill and bake: Place on parchment-lined baking sheets, place in the fridge and chill for at least 30 minutes until the cookies are solid. At this stage you can also freeze the cookies and transfer to a freezer bag. Bake the chilled cookies at 350°F/180°C for 10-12 minutes, until just set but not browned.
- Cool Completely: Let them cool on the baking sheet for a few minutes before transferring to a cooling rack. They’re delicate when warm!
The Secret to Perfect Swirls
The key to beautiful candy cane cookies is in the rolling technique:
✶ Even Thickness – Roll your red and white dough ropes to the same thickness so they twist evenly together.
✶ Not Too Thin – If the ropes are too thin, they become fragile and difficult to work with. Aim for about ½-inch thickness.
✶ Keep Your Hands Clean – Wipe your hands between rolling red and white dough to prevent color transfer and keep the white portions pristine.
✶ Work in Small Batches – Don’t roll all your ropes at once. Work with a few at a time and keep the rest of the dough chilled.
✶ Gentle Twisting – Don’t twist too tightly or the colors will muddle together. A loose spiral keeps the colors distinct and beautiful.
✶ Chill When Needed – If the dough gets too soft and sticky while working, pop it back in the fridge for 10-15 minutes.
✶ Embrace Imperfection – Homemade candy canes don’t need to be perfect! Slightly irregular swirls still look charming and festive.

Storage and Make-Ahead Tips
- Storing Baked Cookies: Keep in an airtight container at room temperature for up to 1 week. Layer with parchment paper to prevent sticking.
- Freezing Baked Cookies: These freeze beautifully! Store in freezer-safe containers for up to 3 months. Thaw at room temperature before serving.
- Make-Ahead Dough: You can make the dough (both colors) up to 3 days ahead. Keep wrapped tightly in the refrigerator, then roll and bake when ready.
- Freezing Shaped Unbaked Cookies: Shape your candy canes, freeze them on a baking sheet, then transfer to freezer bags. Bake from frozen, adding 1-2 minutes to baking time.

Video
Ingredients
- 1 cup (225g) butter room temperature
- 1 cup (200g) sugar
- 1 egg
- 1 teaspoon vanilla extract
- 3 cups (375g) flour
- 1/3 cup (45g) cornstarch
- 1 teaspoon salt
- 1-2 tsp red gel food colouring
Instructions
- In the bowl of a mixer, cream together the butter and sugar until light and creamy.
- Beat in the vanilla and egg scraping down the bowl after mixing in.
- Sift together the dry ingredients then add to the butter mixture. Mix on medium speed until incorporated.
- Divide the dough into two and add the red colouring to one batch. Knead in until a vibrant red is achieved.
- Roll each piece of dough into a log, wrap in plastic wrap and refrigerate for 10-15 minutes.
- Cut a piece of each off then roll each piece into thin logs – approximately ½-inch/1cm wide.
- Wrap the two logs around each other, carefully. Roll the dough together.
- Cut each log into 2-3 pieces, depending on how big you want the candy cane cookies to be, then shape each into a candy cane.
- Place the cookies on baking sheets line with parchment paper.
- Place the cookies in the fridge for 30 minutes.
- Pre-heat the oven to 180ºC/350°F.
- Place the baking sheets into the oven and allow to bake for 10-12 minutes until just set.
- Remove from the oven and allow to cool for 10 minutes.
- Allowing the cookies to cool will set the cookies' shape.
Notes
- I got 36 candy cane cookies out of this amount of dough but my candy canes weren’t very large. The amount of cookies will depend on how big you make the candy canes.
Nutrition
FAQ
Yes! You could use green for a different festive look, or even leave them all white and add sprinkles. The technique works with any color combination.
Use gel or paste food coloring rather than liquid. It gives much more vibrant color without adding excess moisture to the dough.
Keep the twist loose rather than tight, and make sure your dough is properly chilled. When rolling the two ropes together, be gentle but firm. If you are too heavy-handed, you’ll smush the two colors together. Also, wipe your hands between working with red and white dough.
You could roll the two colors together into a log and slice, but you won’t get the traditional candy cane shape. The hand-rolling is what creates the iconic look!
Only if you add peppermint extract! The base recipe is vanilla sugar cookie. You can customize the flavor to your preference.
About ½-inch thick works best. Thinner ropes break easily, and thicker ones don’t twist as nicely.
bsolutely! Baked cookies keep for a week, or you can freeze the shaped unbaked cookies and bake fresh when needed.
Hi,
I found these challenging to roll, but they were such a hit with the kids.
Thank you.