
Easy Sugar Cookie Wreaths
These sugar cookie wreaths are one of my favorite holiday baking projects because they’re just as fun to make as they are to eat. They’re simple, festive and the kind of cookie that kids can help with without you losing your mind.

Forget fussy piping bags and royal icing that takes forever to dry. These use a simple glaze icing that you spread or dip, then shower with Christmas sprinkles. They’re perfect for cookie plates and boxes. The dough is my classic sugar cookie base that’s easy to work with and they come together without any special equipment.
Why You’ll Love This Recipe
No piping skills needed, no special equipment and very little fuss. Kids can help with almost every step, from cutting the shapes to going overboard with the sprinkles. The dough is straightforward and rolls out easily. It also holds its shape while baking and is absolutely delicious.
Ingredients and Substitutions
- Butter. I use salted butter but unsalted can be substituted.
- Sugar.
- Egg.
- Vanilla extract.
- Almond extract.
- Flour. All purpose flour or cake flour.
- Cornstarch.
- Salt.
- For the icing: Powdered sugar/icing sugar, a splash of milk, cream or water and vanilla extract.
- Sprinkles. Go wild with the most festive sprinkles you can find.
Variations
Swap sprinkles for colored sanding sugar for a more elegant look. Tint the icing green with a drop of food coloring.
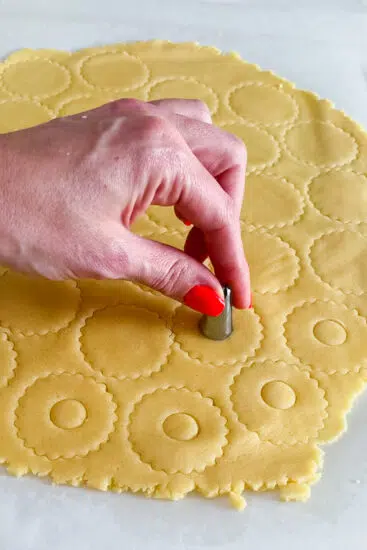
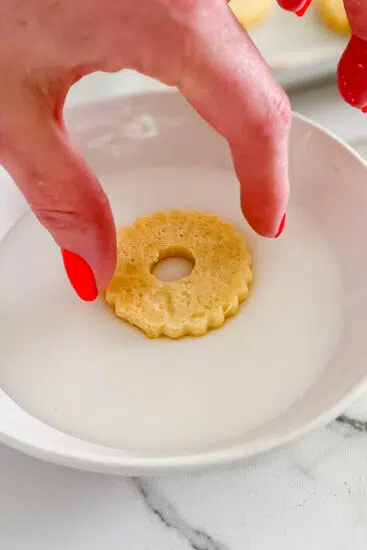
How To Shape and Bake Cookie Wreaths
- Rolling and cutting: Roll the dough out in between two sheets of parchment paper – this is my trick to ensuring the dough rolls out thin enough without sticking to anything. You want it to be around ¼-inch/0.5cm thick.
- Shaping: You don’t need a wreath cookie cutter. I used one my gran’s vintage scone cutters and a piping nozzle for the center. Use a round cookie cutter to cut the outer circle and a smaller cutter to punch out the center. You can make them as big or small as you want. A doughnut cutter is a great option if you have one.
- Baking and icing: Preheat the oven to 180ºC/350°F. Bake the cookies for 8 to 10 minutes until the edges are just set but not browned. You want them pale. They’ll firm up as they cool. Let them cool on the baking sheet for 5 minutes then transfer to a wire rack to cool completely before icing. They must be fully cooled or the icing will melt right off. Once cooled, spread the icing on top with a small knife or the back of a spoon, or dip the top of each cookie directly into the bowl of icing (my choice). Place them on the wire rack and immediately decorate with sprinkle before the icing sets.

Storage and Make-Ahead
The dough can be wrapped tightly and refrigerated for up to 3 days or frozen for up to 3 months. I prefer rolling and cutting the cookies then layering with parchment paper on a baking sheet and flash-freezing before transferring to a freezer bag. Bake the cookies from frozen. Baked, undecorated cookies can be kept in an airtight container at room temperature for up to a week (ideal for decorating parties). Once iced and sprinkled, they keep for up to a week in an airtight container.

Ingredients
- 1 cup (225g) butter room temperature
- 1 cup (200g) sugar
- 1 egg
- 1 teaspoon vanilla extract
- 3 cups (375g) flour
- 1/3 cup (45g) cornstarch
- 1 teaspoon salt
For the icing
- 1½ cups powdered sugar/icing sugar
- 1-2 tbsp water, milk or cream
- ½ tsp vanilla extract
- festive sprinkles
Instructions
- In the bowl of a mixer, cream together the butter and sugar until light and creamy.
- Beat in the vanilla and egg scraping down the bowl after mixing in.
- Sift together the dry ingredients then add to the butter mixture. Mix on medium speed until incorporated.
- Divide the dough into two then roll each piece out between two sheets of parchment paper.
- Using a round cookie cutter, cut out cookie rounds. Use a smaller cutter or piping nozzle to cut out the center of each wreath.
- Place the cookies in the fridge for at least 30 minutes, but up to 3 days.
- Pre-heat the oven to 180ºC/350°F.
- Transfer the cookies to lined baking sheets, spacing them a few centimetres apart (they don't spread much) and place into the oven and allow to bake for 12-15 minutes until very lightly golden brown, with the edges set.
- Remove from the oven and allow to cook for 5 minutes on the baking sheet then carefully transfer to a wire rack and allow to cool completely.
- Whisk together the icing sugar, vanilla and the milk or water. Start with 1 tablespoon and mix until your desired consistency.
- Dip each cookie wreath into the icing, place onto the wire rack and immediately decorate with sprinkles.
- Allow to set completely.
Nutrition
Frequently Asked Questions
Yes, the dough keeps in the fridge for up to 3 days, wrapped tightly in plastic wrap. I prefer rolling and cutting the cookies and flash-freezing before placing in freezer bag and baking from frozen.
Freeze them undecorated for the best results. Baked cookies freeze well for up to 3 months in an airtight container with parchment between the layers. Ice and decorate after thawing.
You can bake the cookies up to a week ahead and store them undecorated in an airtight container. Decorate them the day before or the day of serving for the best look.
You want it thick enough to coat the back of a spoon without running off immediately, but thin enough to spread easily. Start with about 1 tablespoon of liquid, adding more gradually. If sprinkles are sliding off, it’s too thin. Add more powdered sugar.
You can, but it’s not necessary and honestly makes more work for this style of cooking. A piping bag is better for royal icing detail work. For this simple glaze, spreading or dipping is faster and gives you a smooth, even coat that sprinkles stick to perfectly.
About a week in an airtight container at room temperature. We’ve actually had a jar on the counter for almost 2 weeks and they’re still perfect.
Honestly, I think that depends on the sprinkles. I have cookies on the counter I baked 2 weeks ago and the sprinkles are still fine. To be safe, decorate as close to serving time as possible. The day before is perfectly fine.